
Tretmani
Treatments
Beleženje tretmana, pigment formula, biblioteka pigmenata, fotografije pre i posle.
Recording treatments, pigment formulas, the pigment library, before/after photos.
Ažurirano za verziju 1.7.0 - oktobar 2026
Updated for version 1.7.0 - October 2026
Dodavanje novog tretmana
Tretman možeš da zabeležiš sa više mesta:
- ekran „Danas" - dugme „Zabeleži tretman" pri dnu (za klijentkinju bez termina) ili isto dugme na kartici termina
- karton klijentkinje - dugme „Dodaj tretman"; klijentkinja je već izabrana
- detalji termina u kalendaru - „Zabeleži tretman"; klijentkinja, termin i usluga su već popunjeni
- odmah posle potpisane saglasnosti - „Zabeleži tretman", pa se ta saglasnost sama povezuje sa tretmanom
Redosled u formularu:
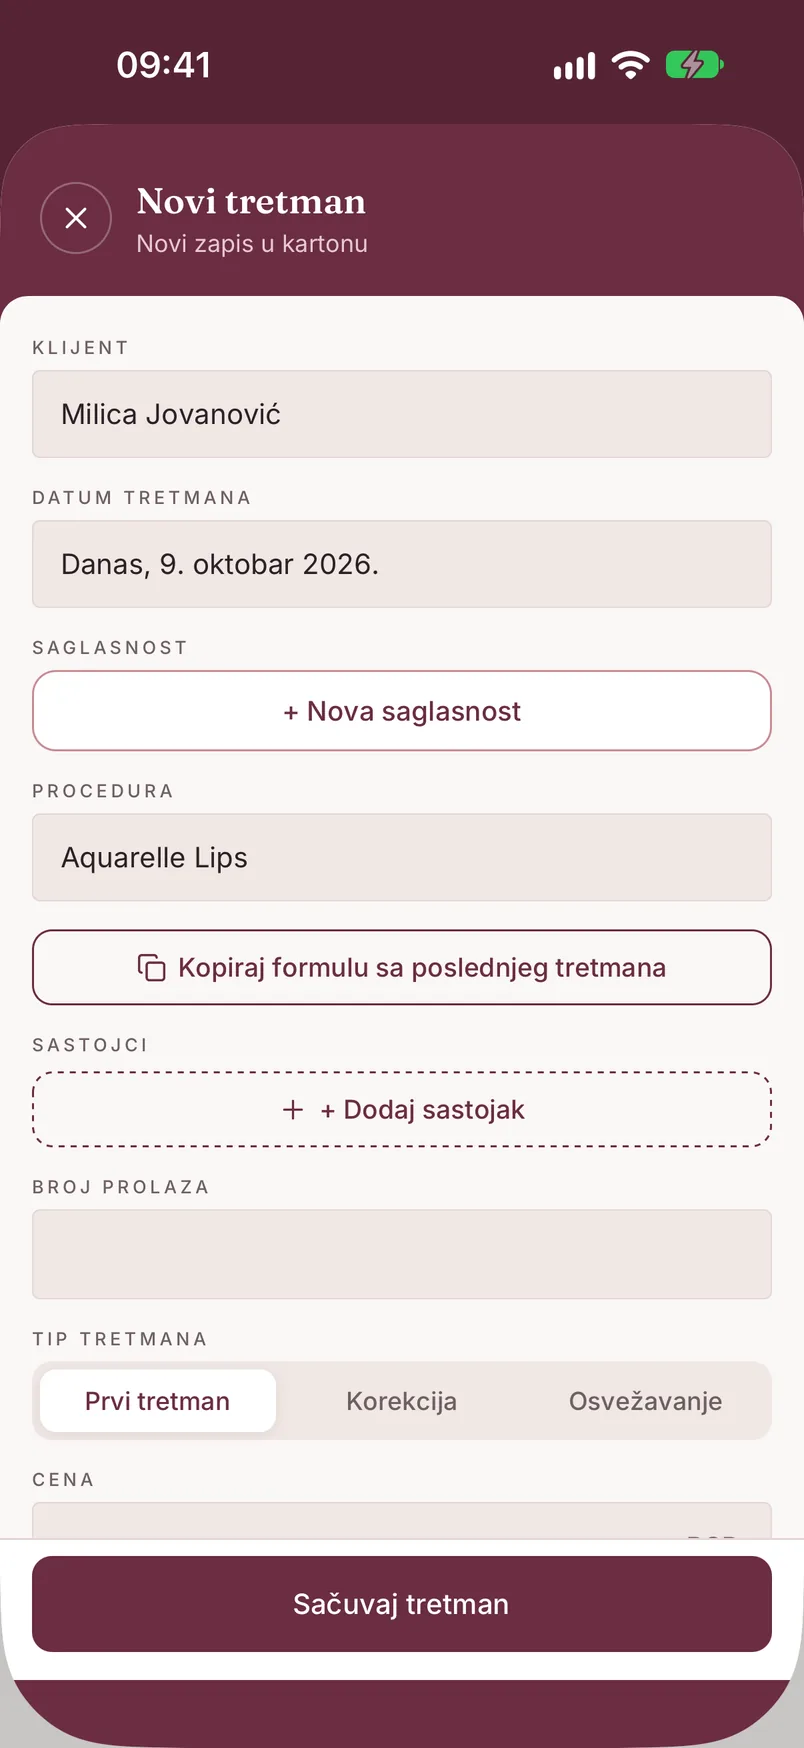
- Klijent - obavezno
- Termin - prikazuje se ako klijentkinja ima termin koji možeš da povežeš („Poveži sa terminom (opciono)")
- Datum tretmana - kad tretman dodaješ bez termina; podrazumevano je današnji dan (videti Tretman rađen ranije)
- Saglasnost - ako klijentkinja ima potpisanu saglasnost, aplikacija je sama povezuje; ako nema, tu je dugme „+ Nova saglasnost"
- Procedura - obavezno; bira se među uslugama tvog salona (Podešavanja > Vrste tretmana)
- Pigment formula - samo za usluge koje koriste pigmente (videti Pigment formula)
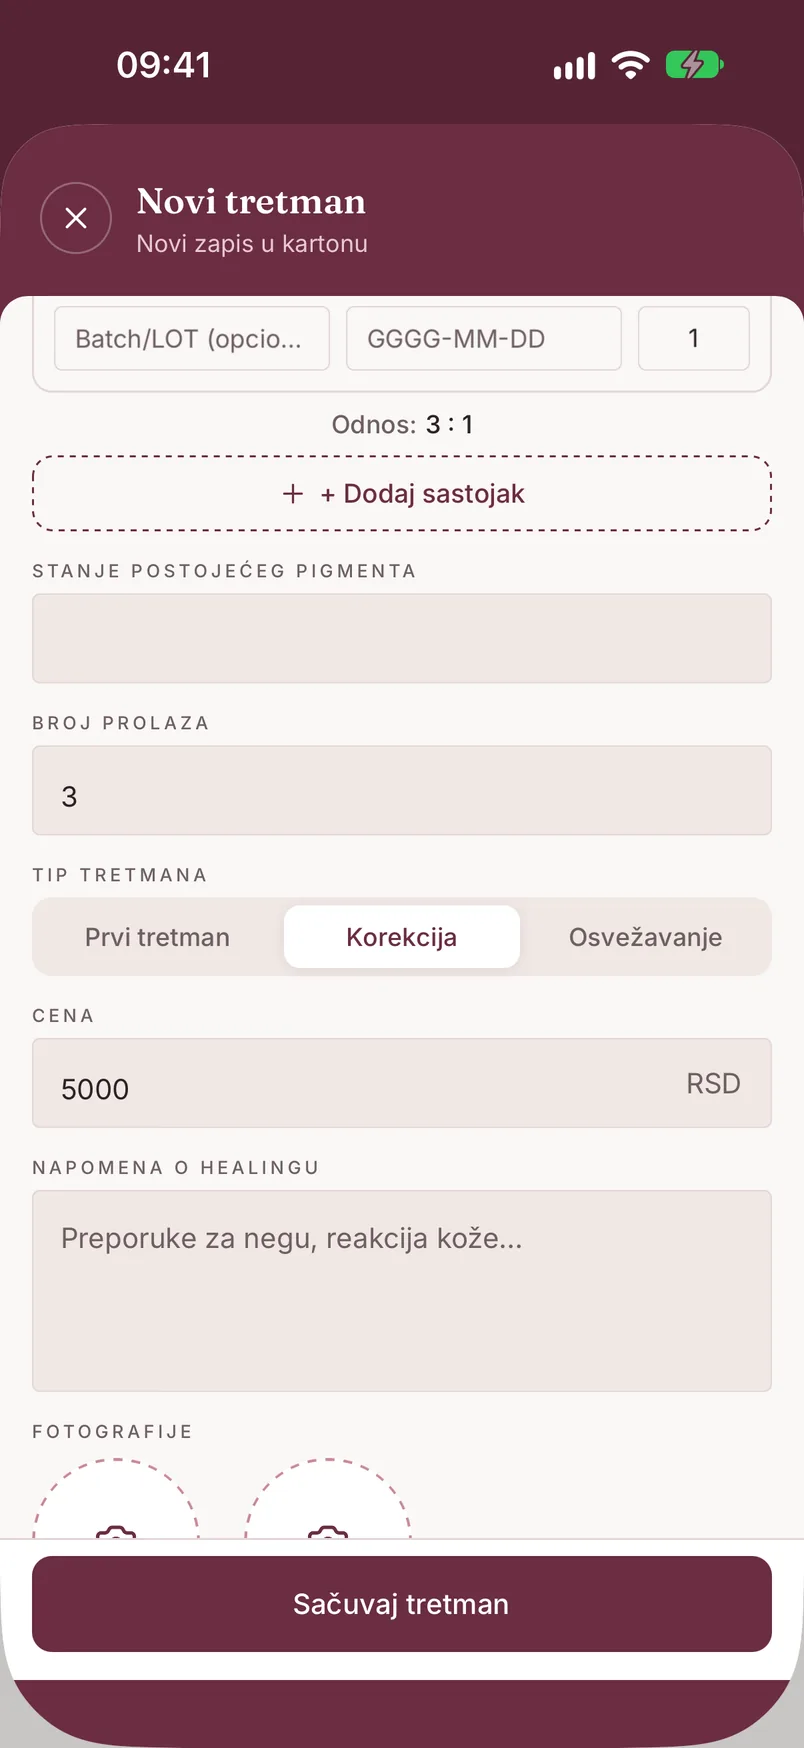
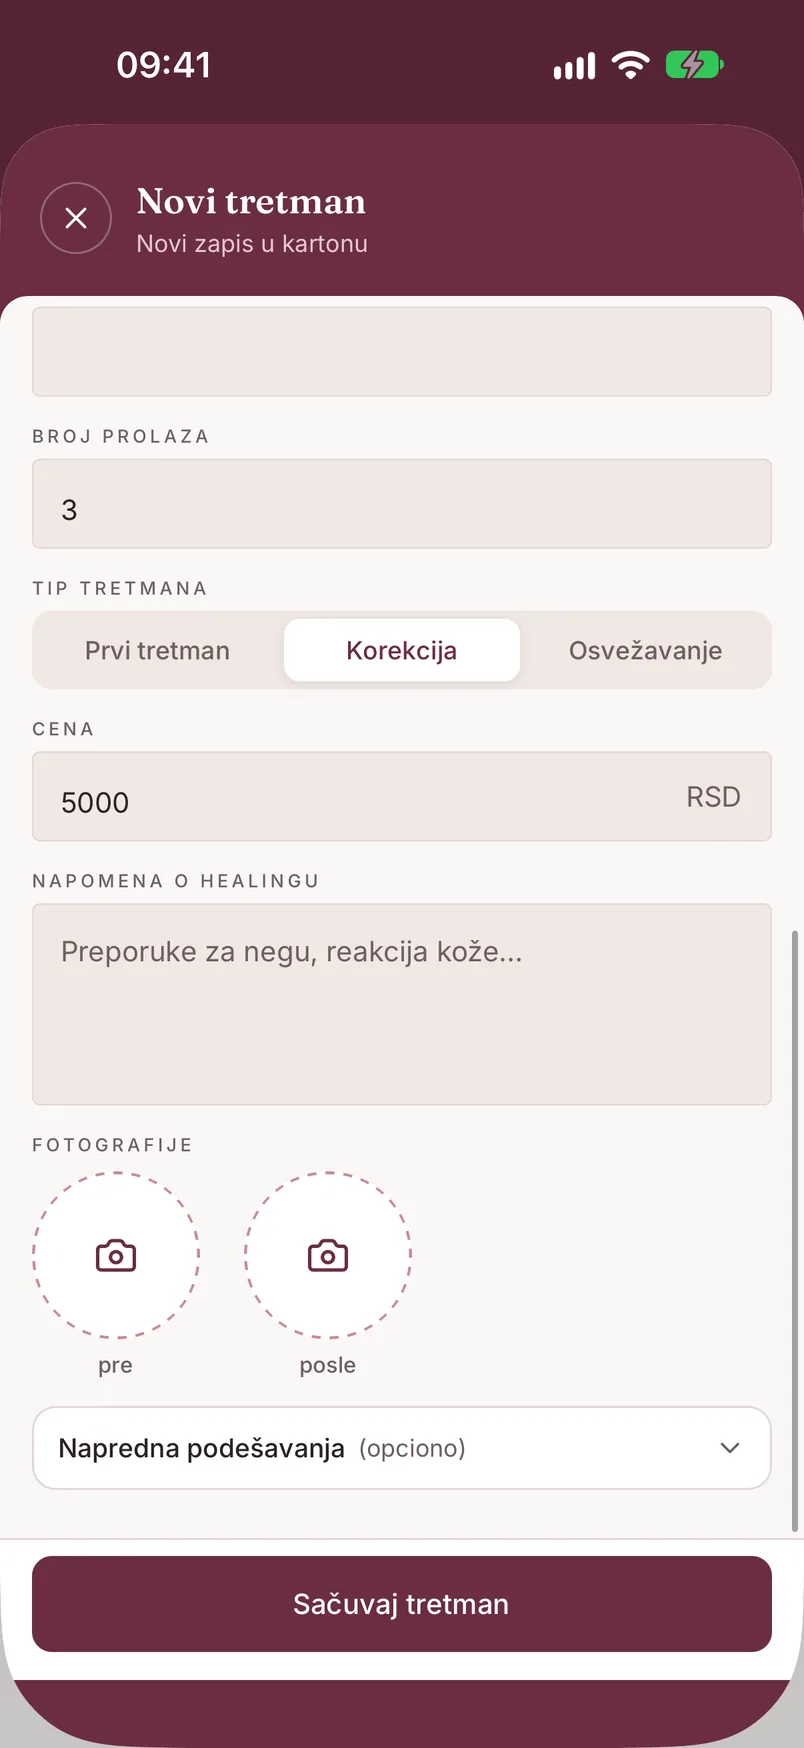
- Tip tretmana - Prvi tretman / Korekcija / Osvežavanje; prikazuje se samo ako usluga ima cene po tipu tretmana
- Cena - u valuti salona (RSD, EUR, BAM ili MKD; bira se u Podešavanja → Profil salona); predlaže se iz usluge i izabranog tipa tretmana, a možeš da je promeniš (0 za gratis)
- Napomena o healingu - preporuke za negu, reakcija kože
- Fotografije - pre i posle
- Napredna podešavanja (opciono) - trajanje u minutima, a za usluge sa pigmentima i anestezija, igla i dubina
Na kraju dodirni „Sačuvaj tretman". Tretman se odmah vidi na kartonu klijentkinje.
Tretman rađen ranije
Kad unosiš tretman koji je rađen pre nego što si počela da koristiš PMUdesk (ili si jednostavno zaboravila da ga zabeležiš), dodirni polje „Datum tretmana" i izaberi dan u prošlosti. Datum u budućnosti ne može da se izabere.
Čim datum nije današnji, ispod polja se pojavljuje napomena „Istorijski tretman - termin i healing poruke nisu dostupni", a povezivanje sa terminom se sklanja iz formulara. Sve ostalo unosiš kao i obično - formulu, cenu, fotografije.
Za tretman stariji od 7 dana healing follow-up ne može da se pokrene: u detaljima tretmana umesto dugmeta piše „Istorijski tretman - healing poruke nisu dostupne". Tako klijentkinja ne dobija uputstvo za negu za tretman koji je odavno zarastao. Ako je tretman rađen u poslednjih 7 dana, uputstvo za negu i dalje možeš da pošalješ iz detalja tretmana - videti Healing follow-up.
Pigment formula
Deo za formulu se pojavljuje čim izabereš proceduru koja koristi pigmente.
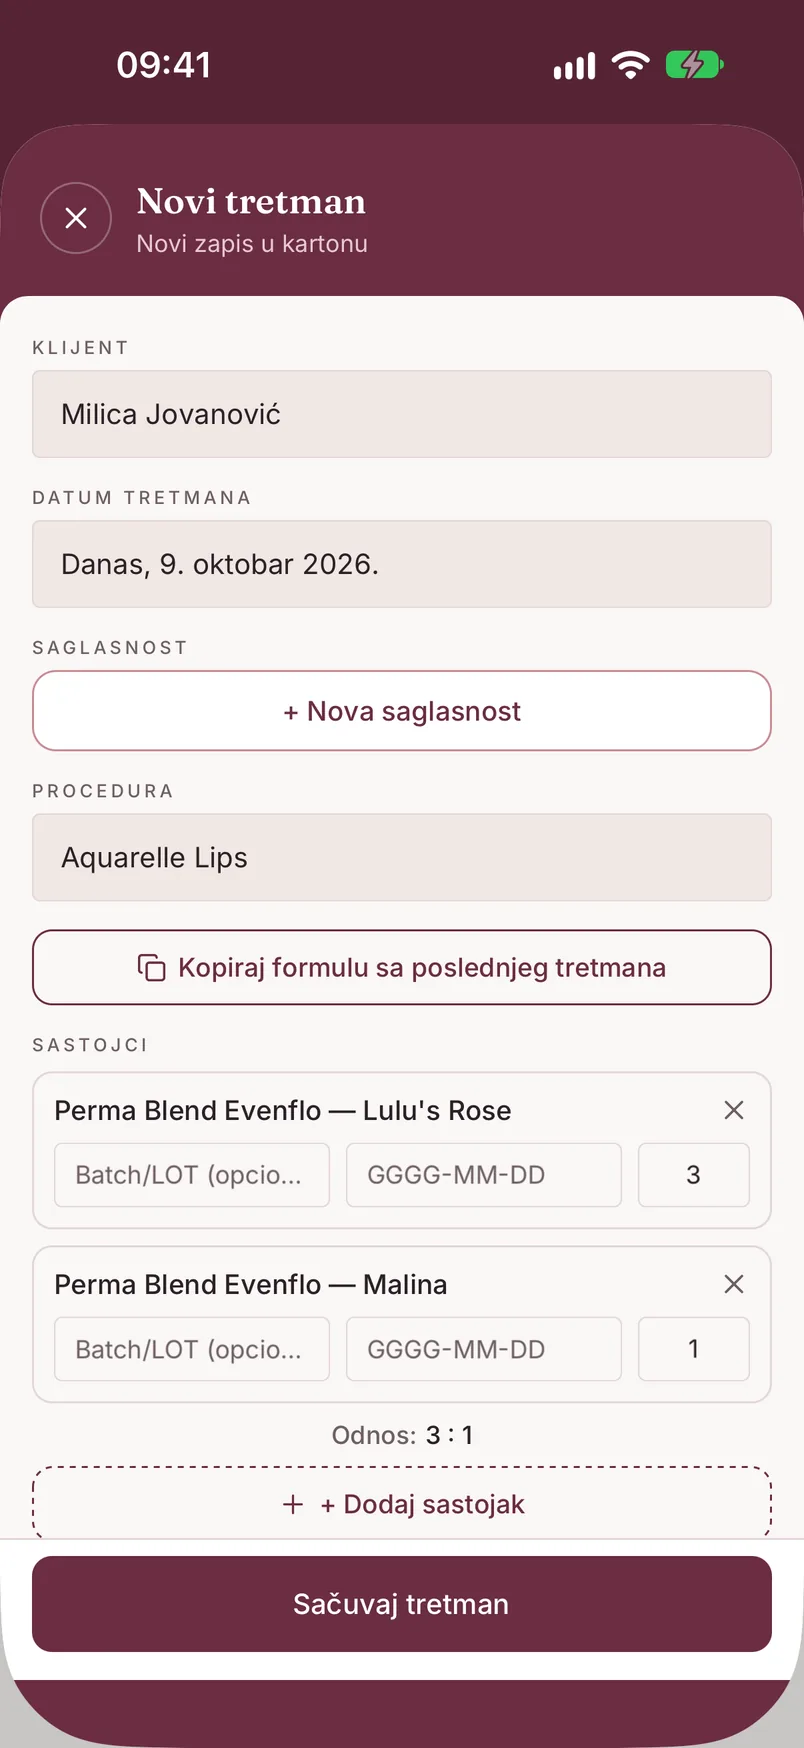
- „Kopiraj formulu sa poslednjeg tretmana" - ako klijentkinja već ima tretman sa formulom, jednim dodirom preuzimaš iste sastojke
- „+ Dodaj sastojak" - otvara listu „Pigmenti" iz biblioteke tvog salona. Ako boje nema, „+ Dodaj u biblioteku" vodi u „Globalni katalog", a „+ Dodaj novi" pravi potpuno novu stavku (Brend, Linija, Naziv boje)
- za svaki sastojak unosiš broj kapi, a po želji i Batch/LOT i rok trajanja bočice. Ako je rok prošao, ispod sastojka stoji upozorenje
- „Odnos" (npr. „Odnos: 3 : 1") aplikacija računa sama iz unetih kapi
- „Stanje postojećeg pigmenta" - samo kod korekcije i osvežavanja
- „Broj prolaza"
Igla i dubina su u delu „Napredna podešavanja". Igla se bira iz liste „Igle" tvog salona na isti način kao pigment - iz kataloga ili kao nova stavka (konfiguracija, npr. 1RL ili 3RS, brend, prečnik, taper).
Biblioteka pigmenata
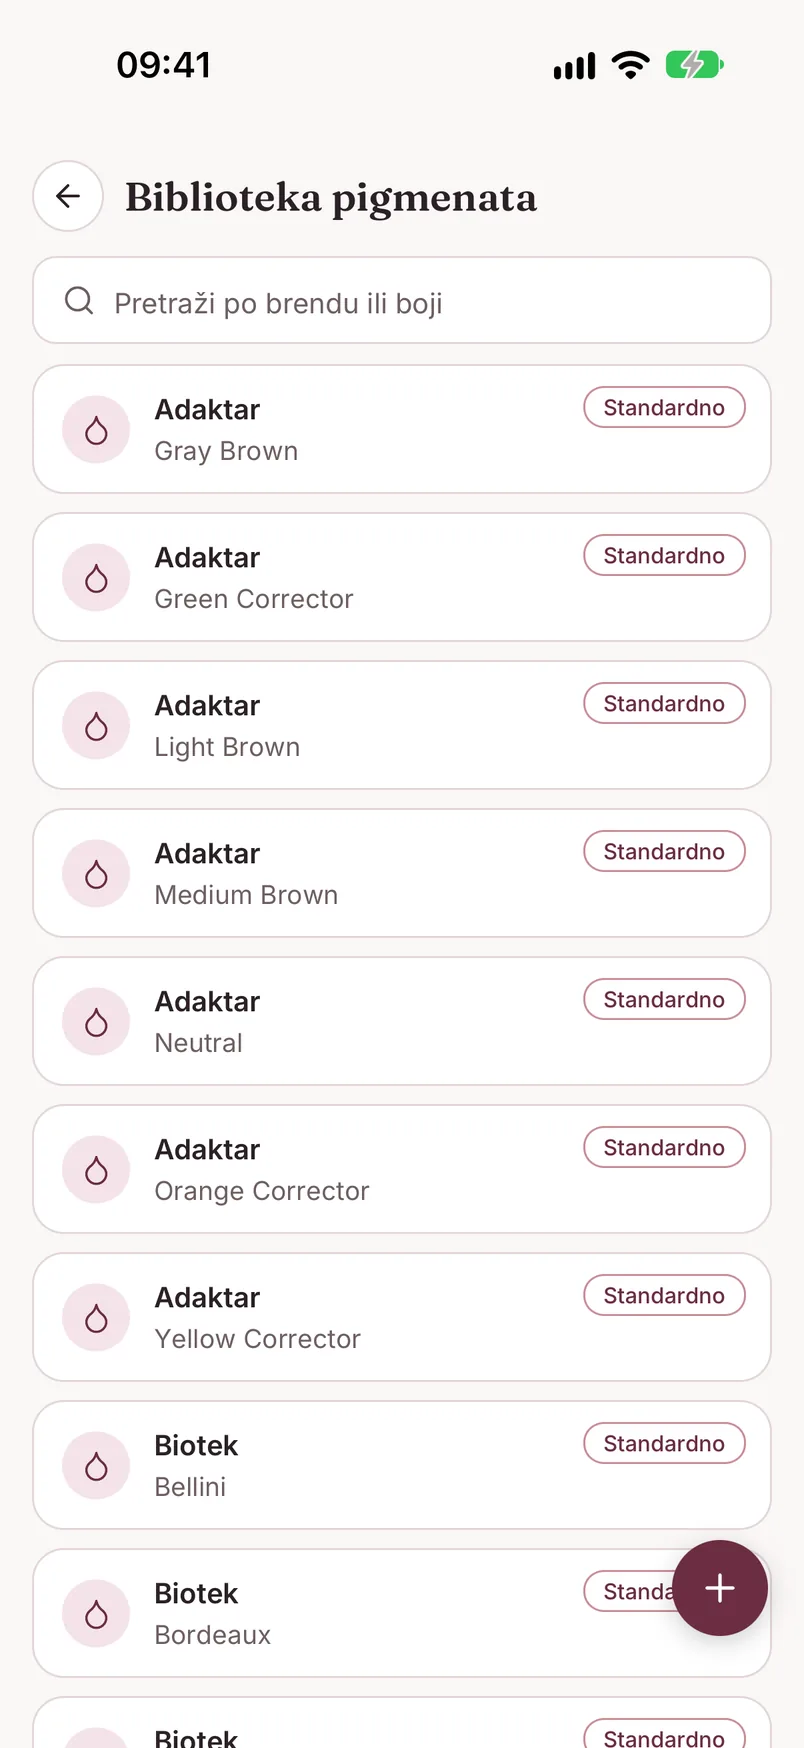
Pigmente možeš da pripremiš unapred, nezavisno od tretmana: Podešavanja > „Biblioteka pigmenata".
Lista već sadrži pigmente poznatih brendova - oni nose oznaku „Standardno". Polje „Pretraži po brendu ili boji" sužava listu dok kucaš.
Plus dugme u donjem desnom uglu otvara „Dodaj pigment": Brend i Naziv boje su obavezni, Linija i Napomene (baza, podton, preporuke za mešanje) opcioni. Pigment koji dodaš vidi samo tvoj salon.
Svoj pigment brišeš dugim pritiskom na njega. Brisanje ne menja već sačuvane tretmane - formula u istoriji ostaje ista. Standardni pigmenti se ne brišu.
Fotografije pre i posle
U delu „Fotografije" formulara su dva kružna polja - „pre" i „posle". Dodir na prazno polje nudi „Kamera" ili „Galerija". Dodir na već dodatu fotografiju otvara pregled sa opcijom „Promeni fotografiju".
Fotografije možeš da dodaš i kasnije: otvori tretman, dodirni „Izmeni" i dopuni polje koje nedostaje.
U detaljima tretmana fotografije su grupisane kao pre, posle i zarastanje. Fotografije zarastanja stižu od klijentkinje: kad ti na healing poruku odgovori slikom, u prepisci dodirneš „Sačuvaj u karton" (videti Healing follow-up).
Detalji tretmana
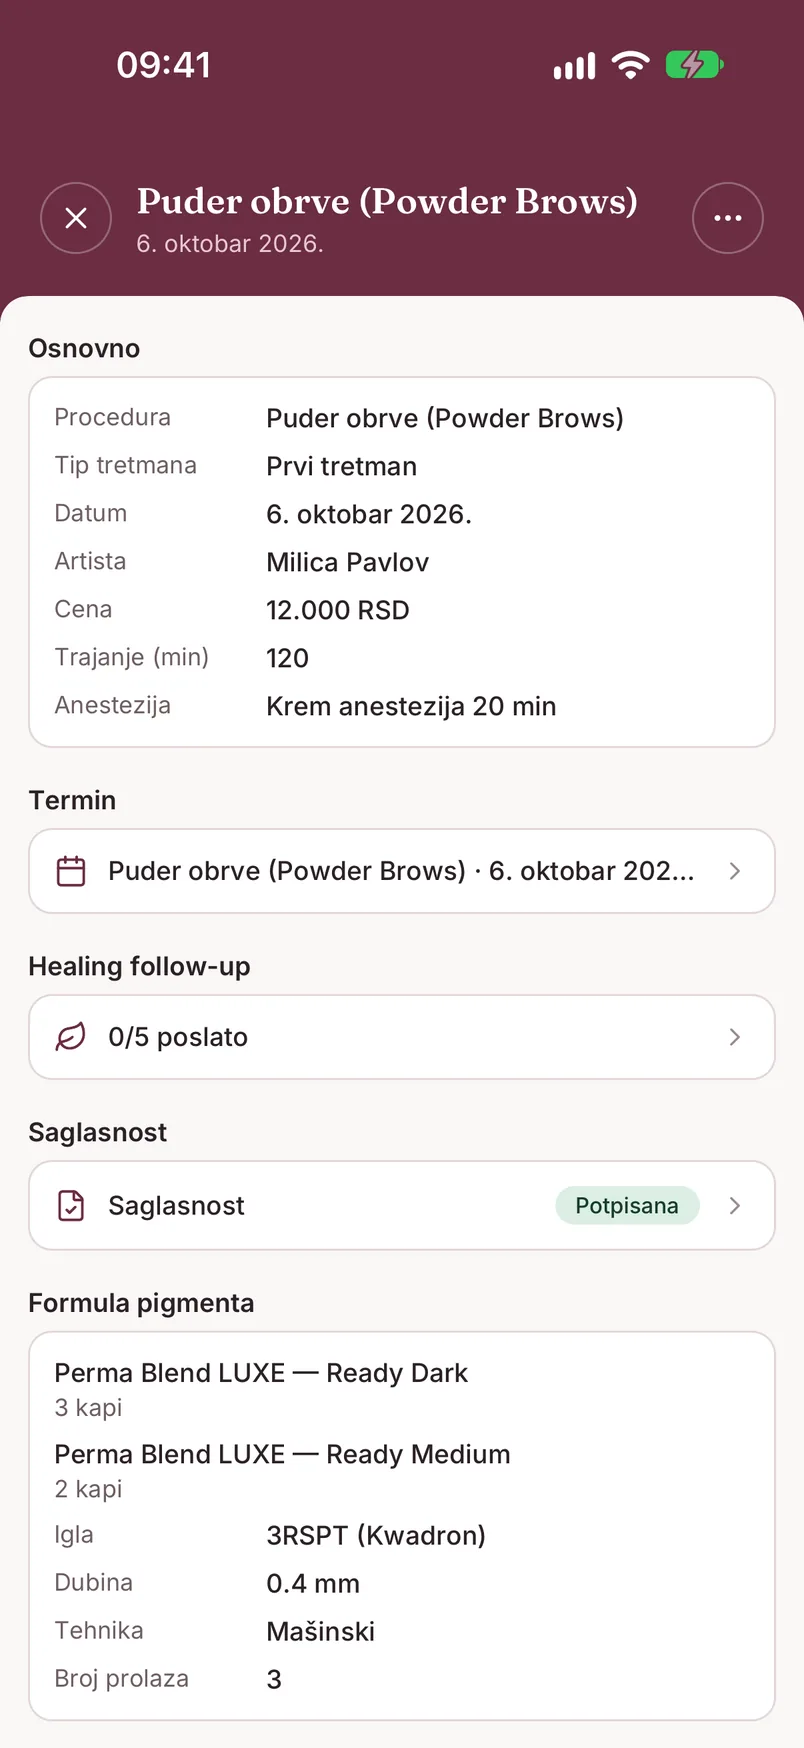
Dodir na tretman (na kartonu ili sa termina) otvara njegove detalje:
- „Osnovno" - procedura, tip tretmana, datum, artista, cena, trajanje i anestezija
- „Termin" - termin sa kojim je tretman povezan; dodir ga otvara
- „Healing follow-up" - dugme „Pošalji uputstvo za negu" ili, kad je sekvenca pokrenuta, koliko je poruka poslato (npr. „2/5 poslato"). Deo Pro plana - videti Healing follow-up
- „Saglasnost" - oznaka „Potpisana" i prečica do dokumenta, ili „bez saglasnosti" uz dugme „+ Nova saglasnost"
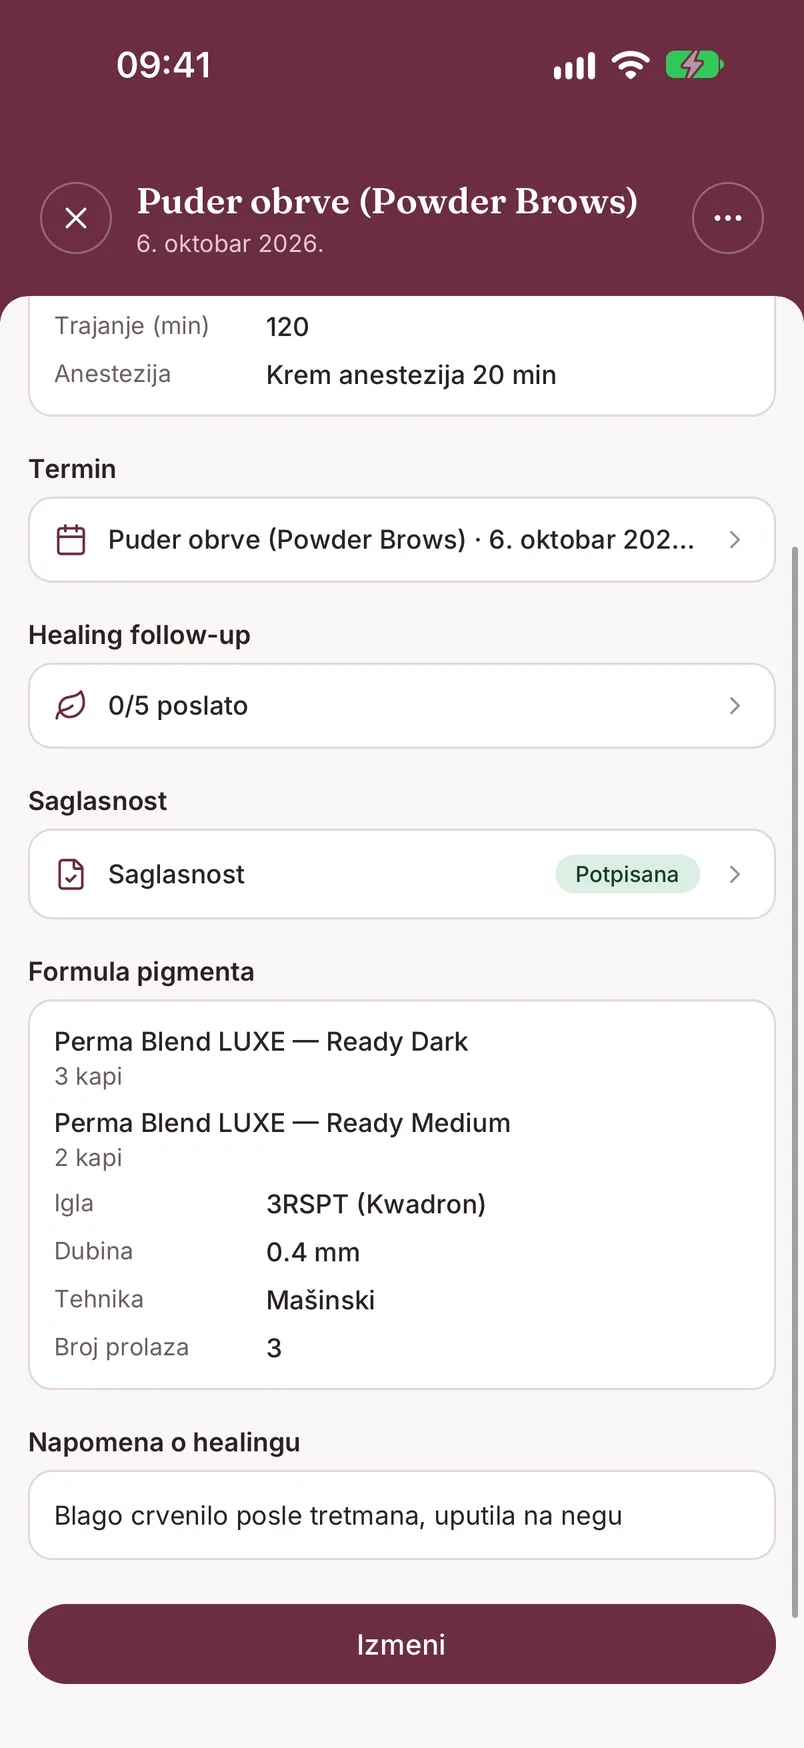
- „Formula pigmenta" - sastojci sa brojem kapi, igla, dubina i broj prolaza
- „Fotografije" i „Napomena o healingu"
Dugme „Izmeni" na dnu otvara isti formular sa popunjenim podacima. Meni ⋯ u gornjem desnom uglu ima „Izmeni tretman" i „Ukloni tretman".
„Ukloni tretman" koristi za tretman unet greškom ili na pogrešnu klijentkinju: tretman nestaje iz kartona i statistike, zakazane healing poruke se zaustavljaju, a saglasnost i termin ostaju sačuvani.
Istorija tretmana na kartonu
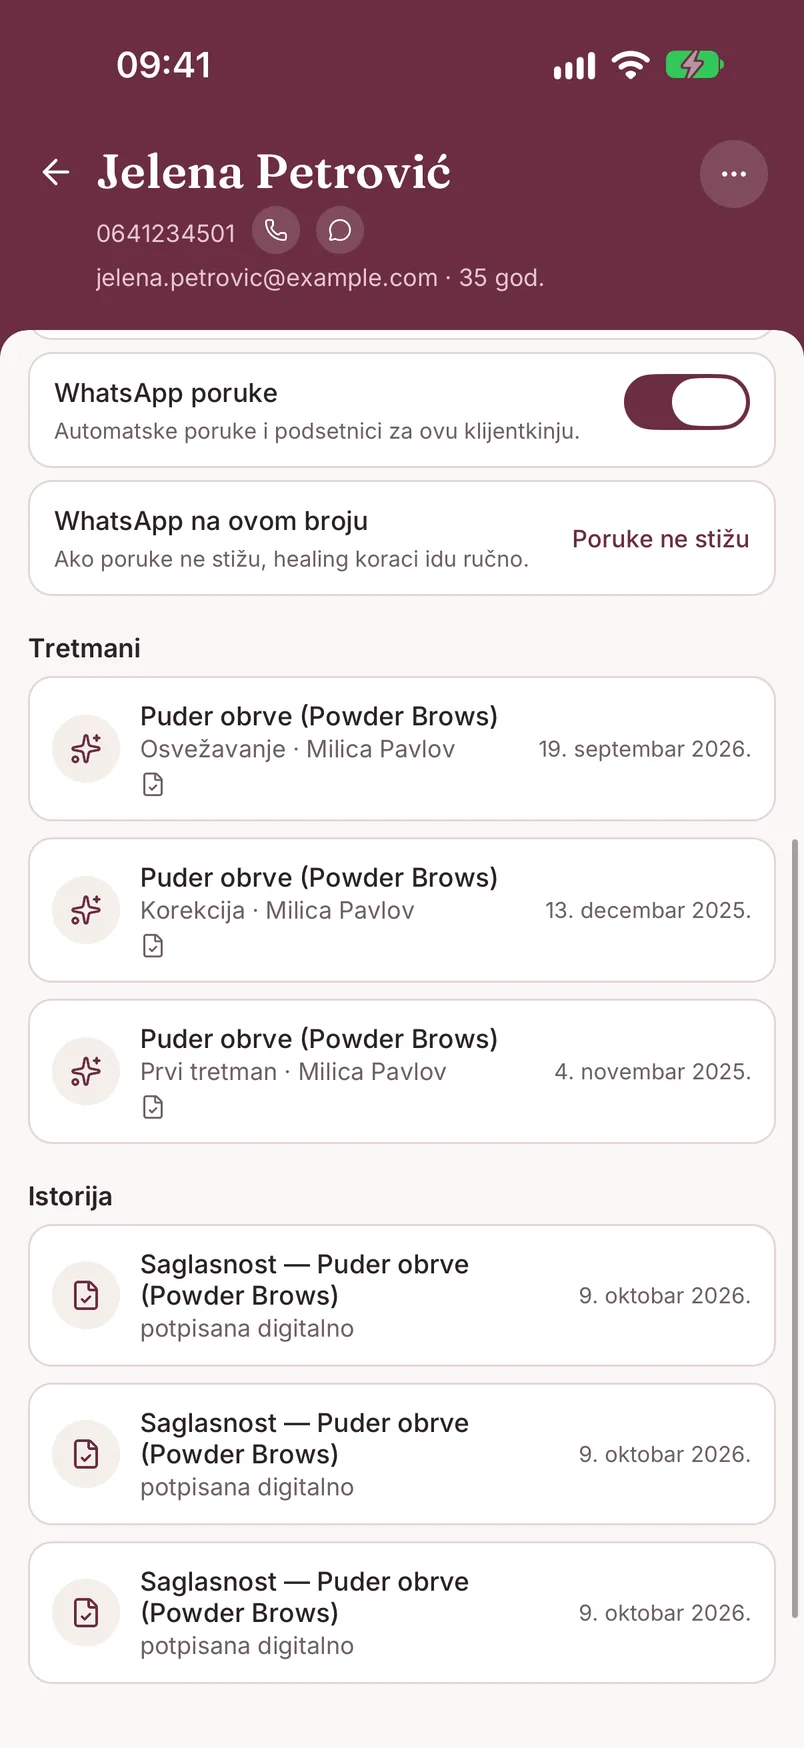
Na kartonu klijentkinje, u delu „Tretmani", tretmani su poređani od najnovijeg. Za svaki vidiš proceduru, tip tretmana, ko ga je radio i datum, a male ikonice pokazuju da li je povezan sa terminom i saglasnošću i koliko ima fotografija.
Tako pre korekcije ili osvežavanja u nekoliko sekundi vidiš šta je rađeno prošli put i kojom formulom. Dodir na tretman otvara njegove detalje.
Adding a new treatment
You can record a treatment from several places:
- the "Today" screen - the "Log treatment" button at the bottom (for a client without an appointment), or the same button on an appointment card
- the client card - the "Add treatment" button; the client is already selected
- appointment details in the calendar - "Log treatment"; the client, appointment and service are already filled in
- right after a signed consent - "Record treatment", and that consent is linked to the treatment automatically
Order in the form:
- Client - required
- Appointment - shown if the client has an appointment you can link ("Link to an appointment (optional)")
- Treatment date - when you add a treatment without an appointment; defaults to today (see A treatment done earlier)
- Consent - if the client has a signed consent, the app links it by itself; if not, there is a "+ New consent" button
- Procedure - required; chosen from your salon's services (Settings > Treatment types)
- Pigment formula - only for services that use pigments (see Pigment formula)
- Treatment type - First treatment / Touch-up / Refresh; shown only if the service has per-type prices
- Price - in your salon's currency (RSD, EUR, BAM or MKD; set in Settings → Salon profile); suggested from the service and the selected treatment type, and you can change it (0 for free)
- Healing notes - aftercare recommendations, skin reaction
- Photos - before and after
- Advanced settings (optional) - duration in minutes, and for pigment services also anesthesia, needle and depth
Finish with "Save treatment". The treatment shows up on the client's card right away.
A treatment done earlier
When you enter a treatment that was done before you started using PMUdesk (or that you simply forgot to record), tap the "Treatment date" field and pick a day in the past. A future date cannot be selected.
As soon as the date is not today, a note appears below the field - "Historical treatment - appointment and healing messages are not available" - and appointment linking is removed from the form. Everything else is entered as usual: formula, price, photos.
For a treatment older than 7 days the healing follow-up cannot be started: in the treatment details, instead of the button, you see "Historical treatment - healing messages are not available". That way a client does not get aftercare instructions for a treatment that healed long ago. If the treatment was done within the last 7 days, you can still send the aftercare instructions from the treatment details - see Healing follow-up.
Pigment formula
The formula part appears as soon as you select a procedure that uses pigments.
- "Copy formula from last treatment" - if the client already has a treatment with a formula, one tap brings in the same ingredients
- "+ Add ingredient" - opens the "Pigments" list from your salon's library. If the color is not there, "+ Add to library" takes you to the "Global catalog", and "+ Add new" creates a brand-new item (Brand, Line, Color name)
- for each ingredient you enter the number of drops and, optionally, the bottle's Batch/LOT and expiry date. If the expiry date has passed, a warning shows under the ingredient
- the "Ratio" (e.g. "Ratio: 3 : 1") is calculated by the app from the drops you enter
- "Existing pigment condition" - only for touch-up and refresh treatments
- "Number of passes"
Needle and depth are under "Advanced settings". The needle is picked from your salon's "Needles" list the same way as a pigment - from the catalog or as a new item (configuration, e.g. 1RL or 3RS, brand, diameter, taper).
Pigment library
You can prepare pigments in advance, independently of any treatment: Settings > "Pigment library".
The list already contains pigments from well-known brands - they carry the "Standard" label. The "Search by brand or color" field narrows the list as you type.
The plus button in the bottom right corner opens "Add pigment": Brand and Color name are required, Line and Notes (base, undertone, mixing recommendations) are optional. A pigment you add is visible only to your salon.
To delete your own pigment, long-press it. Deleting does not change treatments that are already saved - the formula in the history stays the same. Standard pigments cannot be deleted.
Before and after photos
The "Photos" part of the form has two round slots - "before" and "after". Tapping an empty slot offers "Camera" or "Gallery". Tapping a photo you already added opens a preview with a "Change photo" option.
You can also add photos later: open the treatment, tap "Edit" and fill in the missing slot.
In the treatment details, photos are grouped as before, after and healing. Healing photos come from the client: when she replies to a healing message with a picture, you tap "Save to chart" in the conversation (see Healing follow-up).
Treatment details
Tapping a treatment (on the client card or from an appointment) opens its details:
- "Basics" - procedure, treatment type, date, artist, price, duration and anesthesia
- "Appointment" - the appointment the treatment is linked to; tap to open it
- "Healing follow-up" - the "Send aftercare instructions" button or, once the sequence is running, how many messages have been sent (e.g. "2/5 sent"). Part of the Pro plan - see Healing follow-up
- "Consent" - a "Signed" label and a shortcut to the document, or "no consent" with a "+ New consent" button
- "Pigment formula" - ingredients with drop counts, needle, depth and number of passes
- "Photos" and "Healing notes"
The "Edit" button at the bottom opens the same form with the data filled in. The ⋯ menu in the top right corner has "Edit treatment" and "Remove treatment".
Use "Remove treatment" for a treatment entered by mistake or on the wrong client: it disappears from the client card and statistics, scheduled healing messages stop, and the consent and appointment stay saved.
Treatment history on the client card
On the client's card, under "Treatments", treatments are listed newest first. For each one you see the procedure, treatment type, who performed it and the date, and small icons show whether it is linked to an appointment and a consent and how many photos it has.
So before a touch-up or refresh you can see in a few seconds what was done last time and with which formula. Tapping a treatment opens its details.